Docker Volumes - Persisting Data 📙

Welcome back to Docking the Ship: Navigating Docker for Developers! Docker has revolutionized how we build, deploy, and run applications. It provides an isolated environment for running your applications, known as containers. While Docker containers are fantastic for packaging applications, they have one major limitation: data persistence. By default, the data inside a container is ephemeral, meaning it disappears when the container is removed or stopped. This is where Docker Volumes come to the rescue. In this post, we’ll explore Docker volumes, their theory behind them, and how they can be used to persist data across container lifecycles.
What are Docker Volumes?
Docker volumes are a type of storage mechanism designed to persist data outside of containers. They allow you to store data on your host machine, or even on a networked storage system, so that it remains available even if the container is deleted, stopped, or recreated.
Volumes are essentially directories stored outside the container’s filesystem. This means that even though the container’s file system is destroyed when the container is removed, the data in the volume remains intact.
In addition to data persistence, Docker volumes also provide:
- Data sharing: Multiple containers can share the same volume, enabling communication between them via the same file system.
- Performance optimization: Volumes can be stored on host machine directories or network shares, improving data access performance.
- Backup and recovery: Volumes make it easy to back up your data without worrying about the lifecycle of individual containers.
Theory Behind Docker Volumes
Docker containers are designed to be ephemeral, which means they are temporary and disposable. The filesystem inside a container is also ephemeral, meaning any data stored in the container is lost once it is removed. For example, if you were running a MySQL database inside a container and the container crashes or is removed, all your data in MySQL would be lost as well.
This is where Docker volumes come into play. Volumes are persistent storage that exists independently of containers. They can be thought of as specialized directories or filesystems that live outside of containers. Volumes are managed by Docker, and their lifecycle is separate from that of the containers that use them.
In theory, volumes are designed to:
- Persist data beyond container life cycles: Volumes survive container restarts, removal, and creation, ensuring your data remains intact.
- Provide a way to share data: Different containers can use the same volume, making it easy to share and synchronize data across them.
- Enable easy data management: You can back up, restore, and even move volumes across different systems.
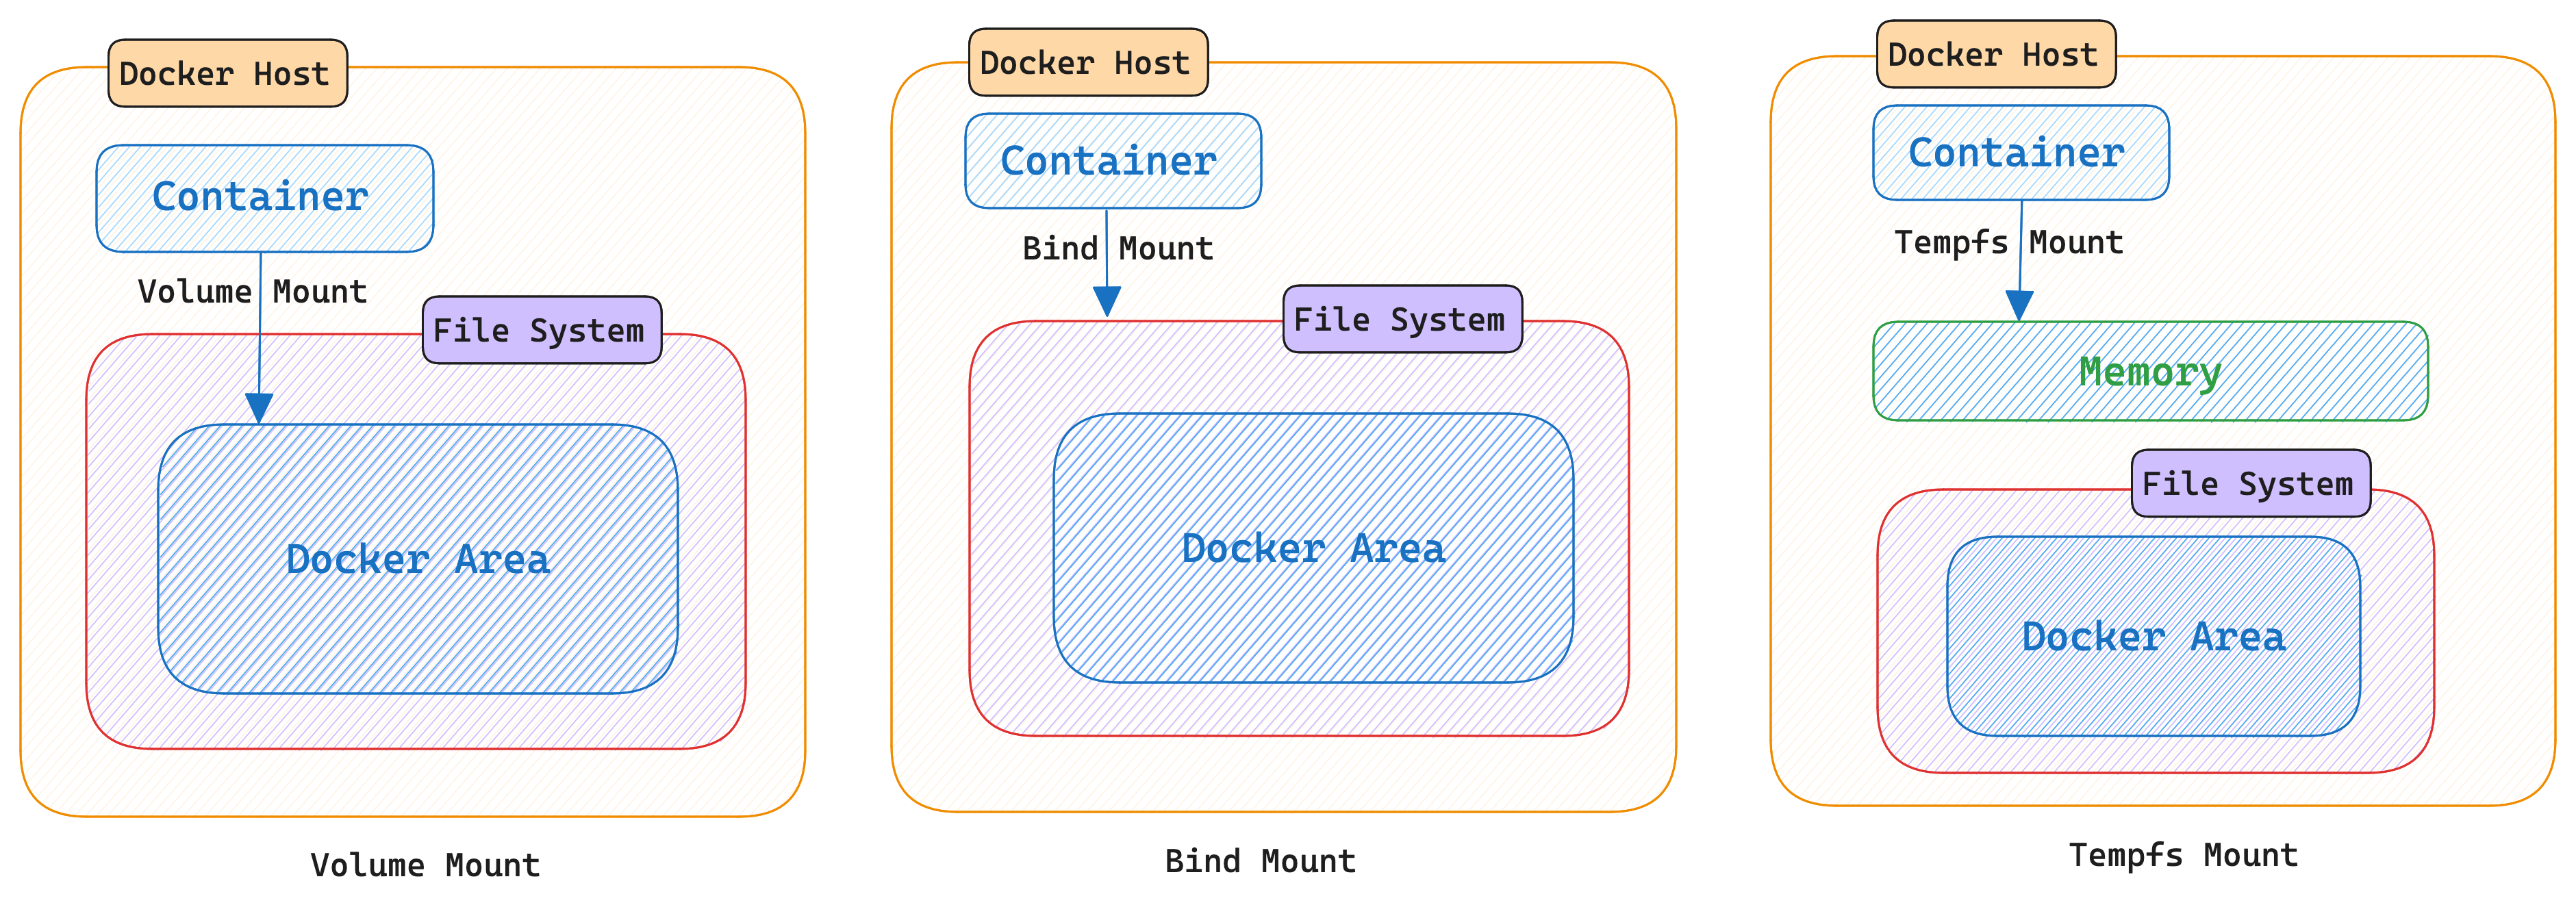
Types of Storage in Docker
Docker supports different types of storage mechanisms:
- Volumes: These are managed by Docker and stored in a location on the host system. They are the preferred option for persisting data.
- Bind Mounts: These are directories or files from the host filesystem that are mounted into the container. While useful, they are less portable and flexible than volumes.
- tmpfs Mounts: These are used to store data in memory, rather than on disk, and are useful for temporary storage needs.
Why Use Docker Volumes?
Here are a few reasons why you should prefer Docker volumes over other storage methods:
- Container Independence: Volumes allow data to persist even when containers are destroyed, updated, or recreated.
- Better Management: Docker volumes can be managed with simple commands (
docker volume create,docker volume ls, etc.), making them easy to maintain. - Performance: Volumes provide optimized performance for persistent storage operations, especially when compared to bind mounts, which can introduce overhead.
- Backup and Migration: Volumes are easily backed up, moved, and restored, simplifying disaster recovery and data migration.
Example: Using Docker Volumes
Let’s walk through an example to demonstrate how Docker volumes work in practice. In this example, we’ll set up a simple MySQL container that uses a Docker volume for data persistence.
Step 1: Create a Docker Volume
First, we’ll create a Docker volume. This volume will hold the database files for MySQL.
Example:
1
$ docker volume create <volume-name>
Let’s create a volume named mysql-data:
1
2
$ docker volume create mysql-data
mysql-data
List all volumes to verify that the volume was created:
1
2
$ docker volume ls
local     mysql-data
Step 2: Run a MySQL Container Using the Volume
Now, let’s run a MySQL container and mount the volume to the appropriate directory inside the container. For MySQL, the data is stored in the /var/lib/mysql directory. We’ll mount our volume to this path.
Example:
1
$ docker run --name <Name> -e MYSQL_ROOT_PASSWORD=<password>  -v <volume-name>:/var/lib/mysql -d mysql:latest
Let’s run a MySQL container named mysql-container with the root password my-secret-pw and mount the mysql-data volume:
1
2
$ docker run --name mysql-container -e MYSQL_ROOT_PASSWORD=my-secret-pw -v mysql-data:/var/lib/mysql -d mysql:latest
83c723c030a54c523b7482c1ed5525ea5c5f1ed4a90b988e1054873ae801ff43
Let’s break down the command:
--name mysql-container: Names the containermysql-container.-e MYSQL_ROOT_PASSWORD=my-secret-pw: Sets the environment variable for the MySQL root password.-v mysql-data:/var/lib/mysql: Mounts themysql-datavolume to/var/lib/mysqlinside the container. This ensures that the database files are stored in the volume.-d mysql:latest: Runs the MySQL container in detached mode using the latest MySQL image.
Verify that the container is running:
1
2
3
$ docker ps
CONTAINER ID   IMAGE          COMMAND                  CREATED         STATUS         PORTS                 NAMES
83c723c030a5   mysql:latest   "docker-entrypoint.s…"   2 minutes ago   Up 2 minutes   3306/tcp, 33060/tcp   mysql-container
Step 3: Accessing MySQL and Adding Some Data
Once the container is running, you can access MySQL by connecting to the container using the docker exec command:
1
$ docker exec -it mysql-container mysql -uroot -p
Enter the password (my-secret-pw), and then create a database and add some data:
1
2
3
4
5
6
7
8
9
10
11
12
13
14
15
$ docker exec -it mysql-container mysql -uroot -p
Enter password:
Welcome to the MySQL monitor.  Commands end with ; or \g.
Your MySQL connection id is 8
Server version: 9.1.0 MySQL Community Server - GPL

Copyright (c) 2000, 2024, Oracle and/or its affiliates.

Oracle is a registered trademark of Oracle Corporation and/or its
affiliates. Other names may be trademarks of their respective
owners.

Type 'help;' or '\h' for help. Type '\c' to clear the current input statement.

mysql>
Now, create a database, a table, and insert some data:
1
2
3
4
5
CREATE DATABASE myapp;
USE myapp;
CREATE TABLE users (id INT AUTO_INCREMENT PRIMARY KEY, name VARCHAR(100));
INSERT INTO users (name) VALUES ('Alice'), ('Bob');
SELECT * FROM users;
You should see the following output:
1
2
3
4
5
6
7
8
9
10
11
12
13
14
15
16
17
18
19
20
mysql> CREATE DATABASE myapp;
Query OK, 1 row affected (0.03 sec)

mysql> USE myapp;
Database changed
mysql> CREATE TABLE users (id INT AUTO_INCREMENT PRIMARY KEY, name VARCHAR(100));
Query OK, 0 rows affected (0.05 sec)

mysql> INSERT INTO users (name) VALUES ('Alice'), ('Bob');
Query OK, 2 rows affected (0.03 sec)
Records: 2  Duplicates: 0  Warnings: 0

mysql> SELECT * FROM users;
+----+-------+
| id | name  |
+----+-------+
|  1 | Alice |
|  2 | Bob   |
+----+-------+
2 rows in set (0.00 sec)
Step 4: Stop and Remove the Container
Let’s stop the MySQL container:
Example:
1
$ docker stop <container_id/name>
1
2
$ docker stop mysql-container
mysql-container
Now, let’s remove the container:
1
$ docker rm <container_id/name>
1
2
$ docker rm mysql-container
mysql-container
At this point, the MySQL container is gone, but the data is still intact in the mysql-data volume.
Step 5: Restart the Container Using the Same Volume
To confirm the data is persistent, we can restart the MySQL container, reattaching the same volume:
Example:
1
$ docker run --name mysql-container -e MYSQL_ROOT_PASSWORD=my-secret-pw -v mysql-data:/var/lib/mysql -d mysql:latest
Create a new container with the same volume:
1
2
$ docker run --name mysql-container -e MYSQL_ROOT_PASSWORD=my-secret-pw -v mysql-data:/var/lib/mysql -d mysql:latest
8b320a152d80e886a5233dea0ba8423461d5be2bda6bdcc55fa118d929d5d399
Once again, access the MySQL instance and check if the data is still there:
1
$ docker exec -it mysql-container mysql -uroot -p
Output
1
2
3
4
5
6
7
8
9
10
11
$ docker exec -it mysql-container mysql -uroot -p
Enter password:
Welcome to the MySQL monitor.  Commands end with ; or \g.
Your MySQL connection id is 8
Server version: 9.1.0 MySQL Community Server - GPL
Copyright (c) 2000, 2024, Oracle and/or its affiliates.
Oracle is a registered trademark of Oracle Corporation and/or its
affiliates. Other names may be trademarks of their respective
owners.
Type 'help;' or '\h' for help. Type '\c' to clear the current input statement.
mysql>
Step 6: Verify that the data is still there:
1
2
USE myapp;
SELECT * FROM users;
SQL Output
1
2
3
4
5
6
7
8
9
10
11
12
13
mysql> USE myapp;
Reading table information for completion of table and column names
You can turn off this feature to get a quicker startup with -A

Database changed
mysql> SELECT * FROM users;
+----+-------+
| id | name  |
+----+-------+
|  1 | Alice |
|  2 | Bob   |
+----+-------+
2 rows in set (0.00 sec)
You should see the data (“Alice” and “Bob”) still present, proving that the volume preserved the data even after the container was removed and recreated.
Managing Docker Volumes
List All Volumes
You can list all volumes on your system with the following command:
1
$ docker volume ls
1
2
3
$ docker volume ls
DRIVER    VOLUME NAME
local     mysql-data
Inspect a Volume
To see detailed information about a specific volume, you can use:
1
$ docker volume inspect mysql-data
Output:
1
2
3
4
5
6
7
8
9
10
11
[
    {
        "CreatedAt": "2025-01-17T05:38:26Z",
        "Driver": "local",
        "Labels": null,
        "Mountpoint": "/var/lib/docker/volumes/mysql-data/_data",
        "Name": "mysql-data",
        "Options": null,
        "Scope": "local"
    }
]
Delete container
Stop the container
1
2
$ docker stop mysql-container
mysql-container
Remove the container
1
2
$ docker rm mysql-container
mysql-container
Remove a Volume
If you no longer need a volume, you can remove it using the following command. Be careful, as this will delete the volume and all data stored inside it:
Example:
1
$ docker volume rm <name>
Delete the volume created earlier:
1
2
$ docker volume rm mysql-data
mysql-data
To remove all unused volumes (dangling volumes), use:
1
docker volume prune
Example:
1
2
3
4
docker volume prune
WARNING! This will remove anonymous local volumes not used by at least one container.
Are you sure you want to continue? [y/N] y
Total reclaimed space: 0B
Conclusion
Docker volumes are essential for persisting data in Docker containers. They provide a clean, efficient, and persistent storage solution for your applications. Volumes are independent of container lifecycles, allowing you to easily back up, share, and manage your data. Understanding Docker volumes is key to building robust, production-grade applications with Docker.
By incorporating volumes into your Docker workflow, you ensure that important data, such as database files or application configurations, are safely stored and accessible even if containers are stopped, removed, or recreated. Volumes are the go-to solution for managing persistent data in a Dockerized environment!
In the next post, we’ll explore Docker Networks: Mapping The Route to understand how to manage and connect containers. Stay tuned, and happy docking! 🚢
Have questions or feedback? Drop them in the comments or connect with me. Let’s navigate the Docker seas together! 🌊